Content
Uploading products in BigCommerce is crucial as it directly impacts sales and customer experience. A well-organized product catalog enhances discoverability, making it easier for customers to find and purchase items, thereby boosting conversion rates. Additionally, detailed product listings with high-quality images, descriptions, and specifications build customer trust and reduce return rates.
However, businesses often neglect this aspect due to the perceived complexity and time consumption involved. Smaller businesses might lack the technical expertise or resources to manage bulk uploads effectively. Others might find it challenging to keep their catalogs updated with the latest inventory, leading to discrepancies that frustrate customers.
This blog will discuss how to upload products to the Bigcommerce store to ensure the store remains up-to-date and provides an exceptional shopping experience for your customers.
How to Upload Products in BigCommerce Using Import Features? Overview
Using the import feature is the most efficient method for adding new products to your BigCommerce store, regardless of whether they originate from a third-party distributor or are manually created. To successfully import new products, you must compile their details into a CSV (Comma-Separated Values) file.
BigCommerce’s product import tool simplifies the management of product and variant details on a large scale. It allows you to update images, inventory levels, custom fields, and various attributes across your entire catalog or specific subsets of products. When importing new products, you have the flexibility to include comprehensive details in your CSV file or opt for basic information, refining and enhancing product details later in the control panel.
But, before that you should be aware that some actions are not supported during the creation of products in a CSV file.
Requirements and Limitations
Before you begin, make sure you have access to a spreadsheet program that supports CSV files, such as Excel or Google Sheets.
To import new products into your store, ensure the following requirements are met:
- Your store must be using the v3 Add/Edit Product experience.
- If currently using the legacy Import/Export system, manually upgrade to the modern experience.
- Ensure your user account has the following permissions enabled:some text
- Manage Products
- Import Catalog Entities
File Formatting Requirements in BigCommerce Import
- Use only CSV file format for import; other formats like XML are not supported.
- The maximum file size for CSV import is 20 MB.
- You can import up to 10,000 products without affecting performance.
- Required fields for new products:
- For physical products: Item, Type, Name, Price, Weight
- For digital products: Item, Type, Name, Price
- Optional fields that should be filled in or removed for successful import.
- Product URL
- Free Shipping
- Is Visible
- Is Featured
- Tax Class
- Product Condition
- Show Product Condition
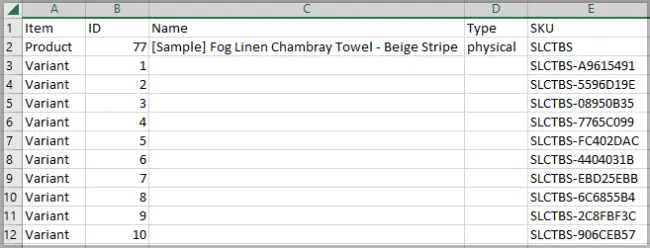
- The Item field is case-sensitive. Use "Product", "Variant", "Image", or "Video" exactly as specified to avoid import errors.
- Variant, Image, or Video rows must be listed directly under the corresponding Product row for correct import.
- Leave the ID field blank for new products.
In addition to the previously mentioned considerations, review the specific requirements for importing variants, images, videos, and custom fields below.
Variant Requirements
When you create product variants via CSV, ensure the following fields are included:
- Item
- ID
- SKU
- Options
- Type (required for the base product, but leave blank for any variants in products)
- Name
- Price
- Weight (only for physical products)
Additional guidelines:
- Leave the ID fields blank for new variants.
- Each product can have up to 600 variants.
- A swatch variant option can have up to three colors.
- Use a publicly accessible image URL for swatch pattern images. (Pattern images must be JPEG/JPG, GIF, WebP, or PNG.)
- Pick lists created via CSV import act as variant options, not modifier options.
- Only simple products (those without variant or modifier options) can be included in a pick list.
- Customers can only choose one value per option; multiple selections from the same option are not allowed.
Image Requirements
When adding images to products, include the following fields:
- Item
- ID (required but leave blank)
- Image URL (Import)
Additional guidelines:
- The "Image is Thumbnail" field is optional but must either be filled in or omitted from the CSV file to import images successfully.
- Image URLs can be up to 1,024 characters long.
- Images must be hosted online with accessible URLs; non-HTTP/HTTPS URLs are unsupported.
- Image files must be JPEG/JPG, GIF, WebP, or PNG; TIFF, BMP, and PDF formats are not supported.
- The optimal size for product images is 1280 x 1280 pixels. Other images (like thumbnails) will be generated from the original image.
- Product images must be no larger than 8 MB.
- Only one image can be added for one variant.
Video Requirements
When adding videos to products, include the following fields:
- Item
- ID (required but leave blank)
- YouTube ID
Additional guidelines:
- Only YouTube videos are supported.
- Videos cannot be added to the product variants.
Custom Field Requirements
Each product can have up to 200 custom fields. Additional guidelines:
- Custom field names and values are limited to 250 characters each.
- When adding new custom fields, do not include an ID. Including an existing custom field ID when adding a new field to a product in your CSV file will update the existing field instead of creating a new one.
- Use straight quotes (" ") instead of curly quotes (“ ”) for custom field elements. If your spreadsheet software converts straight quotes to smart quotes, adjust the settings to use straight quotes by default.
- When using quotation marks (" ") in custom field values, use the HTML character code (") to avoid import errors. Other special characters can be used as normal.
- Example: [{"name":"Color","value":""Blue""}]
- Newline characters are not supported in your product's custom fields.
Importing First Product to BigCommerce Store
Before you upload your entire catalog, start with a single or simple product without variants or images. This approach helps you familiarize yourself with the import process.
The import process involves two main steps: formatting your product information in the CSV file and uploading the file to your BigCommerce Store control panel. The sections below outline the steps and offer helpful tips for your initial import.
Formatting Product Information
In the row below the sample products, enter the information for your first product in the correct fields. Ensure you have filled out the minimum required fields. Some tips for entering information in the import fields:
- Item: This should be "Product", rather than "Variant", "Image", or "Video".
- ID: Leave this field blank.
- Type: Set this as "physical" for your first product. You cannot add digital product files via CSV import.
- Inventory: If left empty or set to "none", the product will not have its inventory tracked. For your first import, set this to "none" or "product".
- Price: Exclude any currency symbols. Product prices will be imported in your store’s default currency.
- Channels: For simplicity, assign the product to your default storefront channel by entering "1" in this field.
- Categories: Leave this field empty for your first product. You need to create categories in your store and find the category ID in the control panel URL before assigning categories via CSV import.
- Description: If you're not comfortable with HTML formatting, enter your product description as plain text. You can customize it in your control panel after importing.
- Product URL: CSV import does not automatically generate product URLs. Refer to the SEO Fields section for examples of SEO-friendly URLs.
- Weight: Exclude units, as these are automatically applied based on your store’s physical dimension settings. This also applies to the Width, Height, and Depth fields.
After entering your product’s details in the CSV file, save your changes.

Uploading the CSV File for Import
Once you've entered the product details into your CSV file, follow these steps to upload it:
1. Navigate to Import Page: Go to Products › Import in your control panel.
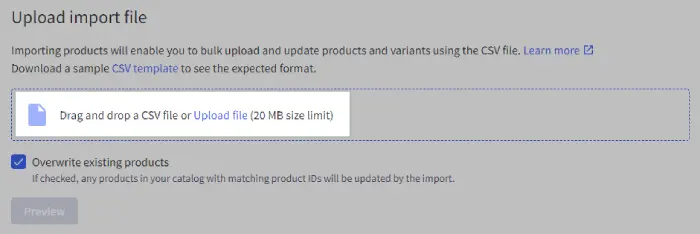
2. Upload Your File: Drag and drop your CSV file into the upload field, or click "Upload file" to select the file from your computer.

3. Overwrite Existing Products: The "Overwrite existing products" option is checked by default. Since you are importing a new product, you can leave this option checked or unchecked. Click "Preview" to proceed.

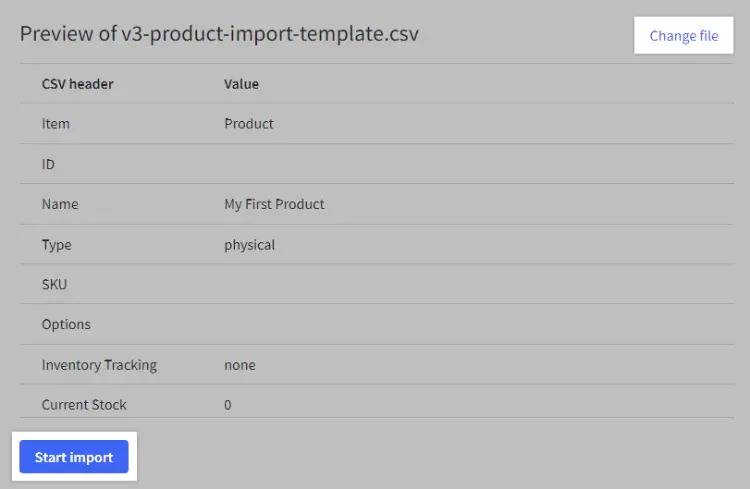
4. Preview Your Data: The Preview page will display all fields in the CSV file along with the values entered for your first product.
5. Review and Confirm: Carefully review your product details. If you notice any issues, click "Change file" to go back to the Upload page. If everything looks correct, click "Start import" to proceed.

6. Monitor Import Progress: During the import process, a progress bar will indicate how many products have been imported. This process will complete quickly for a single product, but for larger imports, you can navigate to other areas of the control panel while the import continues in the background.
7. Stop Import if Needed: If you need to halt the import for any reason, click "Stop Import." Confirm your decision by clicking "Yes, stop import" in the popup window, or click "Close" to continue the import.

8. Review Import Summary: After the import is complete, a summary will appear indicating whether the product was imported successfully or if there were any errors. The summary will remain in Products › Import until you start a new import, allowing you to revisit it if necessary.

9. Address Errors, if Any: If your product import encountered errors, correct the information in your CSV file according to the error messages provided. Then click "Start new import" to upload the updated file. If there are no errors, click "View product list" to access the newly-created product in the control panel for further edits, if desired.
Conclusion
Uploading images to a BigCommerce store may appear straightforward, but it comes with its challenges, particularly when dealing with complex products or a high volume of items. Ensuring images are of high quality, properly formatted, and consistently applied can be time-consuming and prone to errors. Additionally, managing bulk uploads and maintaining an organized catalog requires attention to detail and technical know-how.
Due to these potential difficulties, many businesses opt to outsource this task to specialized services. Outsourcing can streamline the process, ensure professional results, and free up internal resources to focus on core business activities, ultimately enhancing the overall efficiency and presentation of the online store.
Invensis provides comprehensive solutions for uploading products to e-commerce platforms like BigCommerce. Our experienced BigCommerce data entry services have efficiently handled complex product uploads, ensuring accuracy and scalability. Our team’s expertise in managing large volumes of data and maintaining quality standards has significantly benefited our clients, allowing them to focus on strategic business initiatives while ensuring the online store remains robust and competitive.
Frequently Asked Questions
Discover Our Full Range of Services
Click HereExplore the Industries We Serve
Click HereBlog Category
Related Articles

Find the leading accounting firms in Singapore trusted by businesses for audit, tax, and advisory services.
November 6, 2025
|

Explore the leading accounting firms in South Africa providing expert audit, tax, cloud accounting, and payroll services. Learn about their key features and unique offerings.
November 6, 2025
|

Explore what project accounting is, how it works, and why it’s essential for businesses. Understand key principles, revenue recognition methods, and best practices to improve your knowledge.
October 7, 2025
|
Services We Provide
Industries We Serve


.webp)